 |
|||
|
|
|||
|
Page Title:
FOURTH CLUTCH MAINTENANCE - continued |
|
||
| ||||||||||
|
|
 TM 9-2320-386-24-1-2
0376 00
FOURTH CLUTCH MAINTENANCE (Contd)
CLEANING AND INSPECITON
.WARNING.
Volatile mineral spirits burn easily and fumes can explode. Do not smoke
or allow flames nearby when using volatile mineral spirits. Failure to do
so may cause serious injury or death.
1. All metallic parts should be cleaned thoroughly with mineral spirits and dried with a lint-free rag.
2. Inspect internal-splined clutch plates (3) and external-tanged clutch plates (4) for burrs, pits, wear,
cracks, distortion, and damaged teeth. Remove burrs with a soft stone. Replace internal-splined
clutch plates(s) (3) or external-tanged clutch plate(s) (4) if burred, pitted, cracked, distorted, or if
teeth are damaged.
3. Measure thickness of internal-splined clutch plates (3). Thickness should not be under 0.071 in.
(1.80 mm). Replace internal-splined clutch plate(s) (3) if thickness is not within limits.
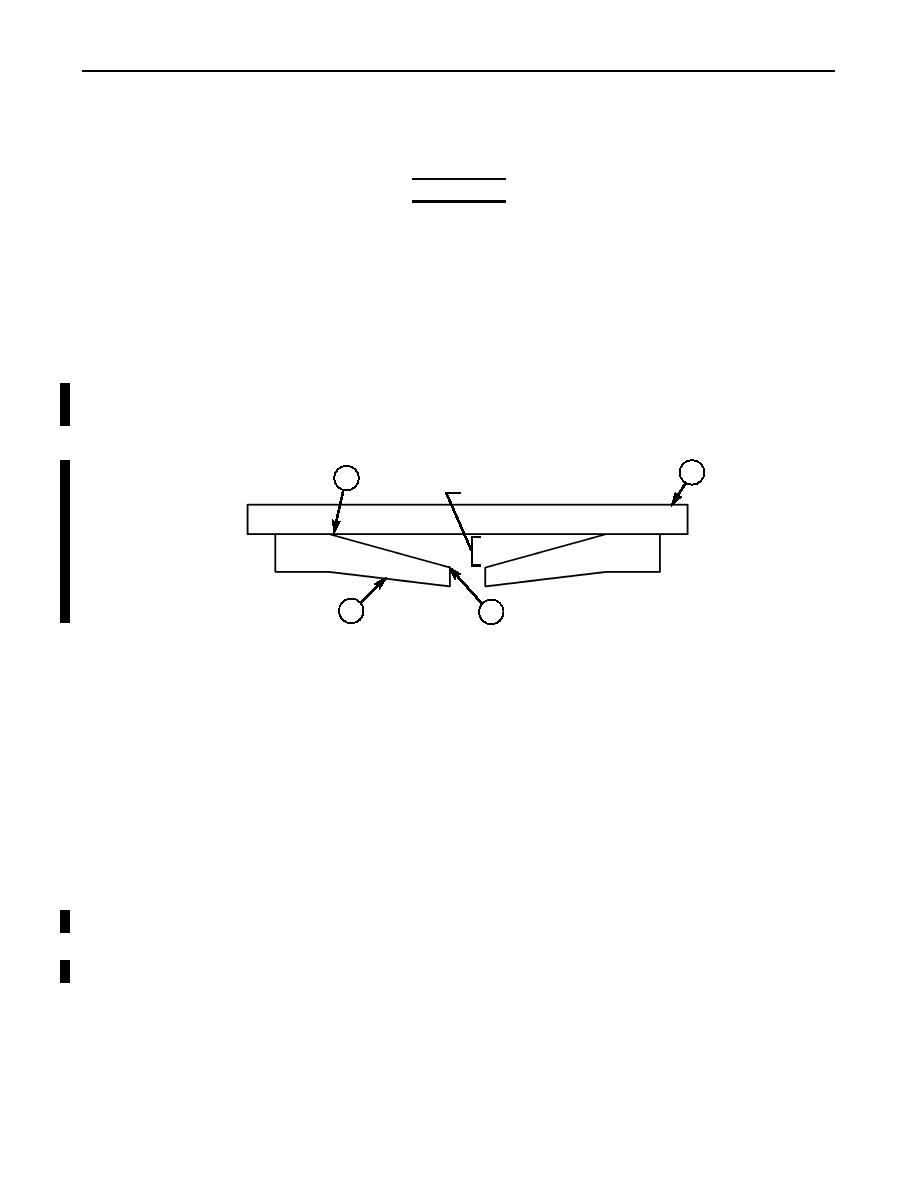
4. Place external-tanged clutch plates (4) on clean, level surface. Place straight edge (1.1) across top of
external-tanged clutch plate (4). Measure distance from inside (1.2) to highest point of clutch plate
(1). Replace external-tanged clutch plate(s) (4) if distance exceeds 0.004 in. (0.10 mm).
5. Check backplate (2) for signs of wear and scoring. Replace backplate (2) if worn or scored.
1.1
1
DISTANCE NOT TO EXCEED
0.004 in. (0.10 mm)
4
1.2
ASSEMBLY
NOTE
If replacing with a new piston, ensure identification REV letter (A, B,
or C) is the same as old piston.
1.
Apply oil-soluble grease to new outer seal (9) and new inner seal (8).
2.
Place piston (6) on work bench with spring side facing upward.
3.
Install new outer seal (9) on piston (6). Ensure lip faces downward.
4.
Install new inner seal (8) on piston (6). Ensure lip faces downward.
5.
Apply lubricating oil to outside surface of clutch inner seal protector and inner surface of clutch
outer seal protector and position over inner seal (8) and outer seal (9).
6.
Install piston (6) on fourth clutch housing (7) and remove clutch outer seal protector and clutch
inner seal protector.
7.
Check clutch running clearance:
a. Starting with external-tanged clutch plate (4), alternately install five external-tanged clutch
plates (4) and internal-splined clutch plates (3) on piston (6).
b. Install backplate (2) on fourth clutch housing (7) with snapring (1.3).
c. Using clutch clearance gauge, measure clearance between backplate (2) and internal-splined
clutch plate (3). Clearance should be 0.0765-0.1265 in. (1.943-3.213 mm). If clearance is not
within limits, remove snapring (1.3), backplate (2), five internal-splined clutch plates (3), and
external-tanged clutch plates (4) from fourth clutch housing (7). Discard clutch plates (3) and (4).
d. Repeat steps a through c with new external-tanged clutch plates (4) and internal-splined clutch
plates (3) installed. If clearance is still excessive, replace with thicker piston (6). If clearance is
insufficient, replace with thinner piston (6).
e. When correct clearance is found, remove clutch pack and tie together for further assembly.
8.
Install sixteen springs (5) and spring retainer (10) on piston (6).
9.
Position fourth clutch housing (7) on arbor press.
Change 1
0376 00-4
|
|
Privacy Statement - Press Release - Copyright Information. - Contact Us |
