 |
|||
|
|
|||
|
Page Title:
DISCHARGE VALVE REPLACEMENT (M49A2C) - continued |
|
||
| ||||||||||
|
|
 TM 9-2320-361-24-2
0263 00
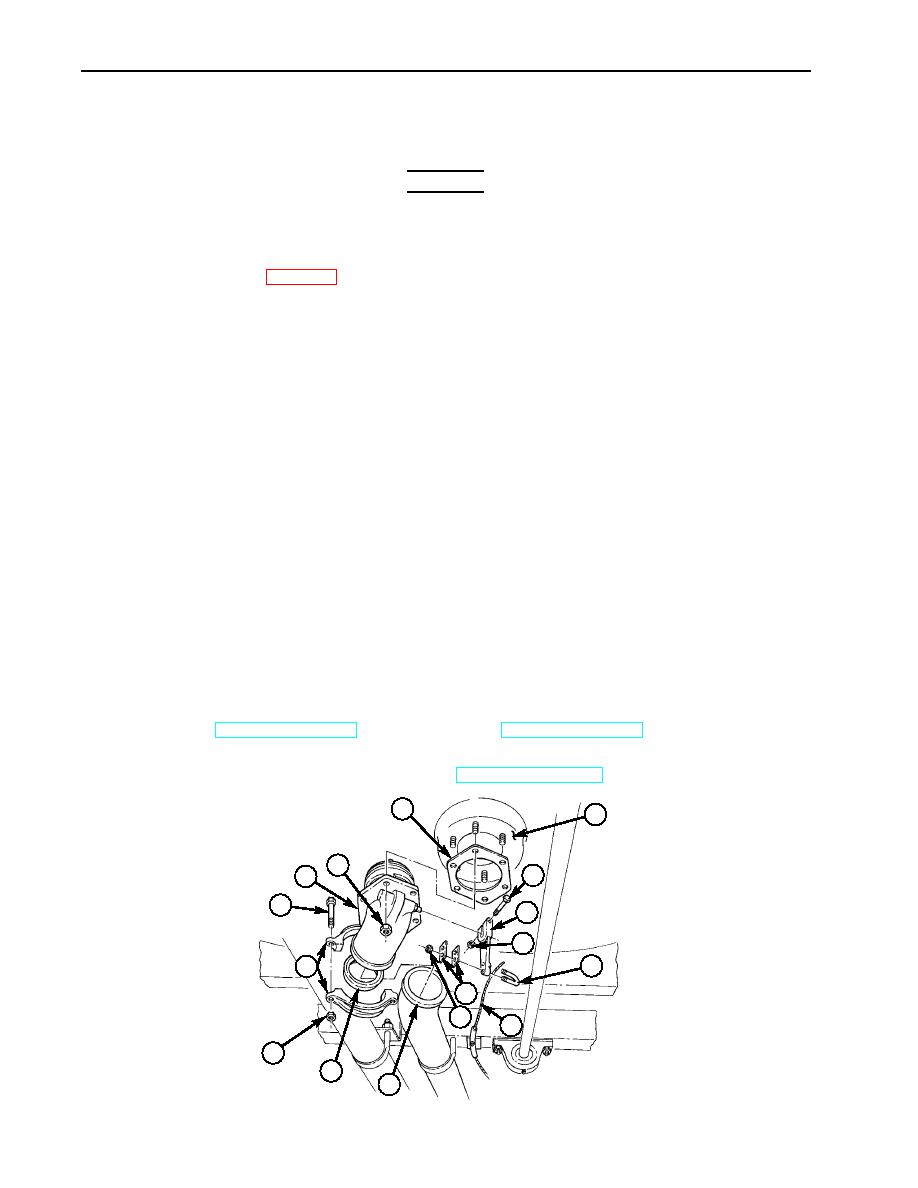
DISCHARGE VALVE REPLACEMENT (M49A2C) (Contd)
WARNING
Diesel fuel is flammable. Do not perform fuel system procedures near open
flames. Injury or death to personnel may result.
Accidental or intentional introduction of liquid contaminants into the
environment is a violation of state, federal, and military regulations. Refer to
Army POL (WP 0001 00) for information concerning storage, use, and
disposal of these liquids. Failure to do so may result in damage to
environment and health of personnel.
NOTE
Both discharge valves are removed the same way.
Use a drain pan to capture any draining fuel. Dispose of fluids in accordance
with local policy and ordinances. Ensure all spills are cleaned up.
REMOVAL
1. Remove two locknuts (10), plates (9), U-bolt (7), and discharge valve cable (8) from discharge
lever (5). Discard locknuts (10).
2.
Remove locknut (6), screw (4), and lever (5) from discharge valve (16). Discard locknut (6).
3.
Remove two locknuts (13), screws (15), coupling (14), and gasket (12) from discharge valve (16)
and drain tube (11). Discard locknuts (13) and gasket (12).
4.
Remove six locknuts (1), discharge valve (16), and gasket (2) from bottom of tank (3). Remove
gasket remains from mating surfaces. Discard gasket (2) and locknuts (1).
INSTALLATION
1. Install new gasket (2) and discharge valve (16) on bottom of tank (3) with six new locknuts (1).
2.
Install new gasket (12) and drain tube (11) on discharge valve (16) with coupling (14), two
screws (15), and new locknuts (13).
3.
Install lever (5) on discharge valve (16) with screw (4) and new locknut (6).
4.
Install cable (8) on lever (5) with U-bolt (7), two plates (9), and two new locknuts (10). Remove
slack in cable (8) and tighten nuts (10).
5.
Fill fuel tanks (TM 9-2320-361-10) and check for leaks (TM 9-2320-361-10).
6.
Connect battery ground cable (WP 0126 00).
7.
Release parking brake and remove wheel chocks (TM 9-2320-361-10).
2
3
1
4
16
15
5
6
7
14
9
10
8
13
12
11
END OF WORK PACKAGE
0263 00-2
|
|
Privacy Statement - Press Release - Copyright Information. - Contact Us |
